
Enable Self-Hosted Runners on GitHub
Before you can use Machine’s high-performance runners, you may need to configure your GitHub organization or account to allow self-hosted runners. This guide walks you through the necessary GitHub settings.
Why This Configuration is Needed
Machine provides self-hosted runners that connect to your GitHub workflows. By default, some GitHub organizations restrict which repositories can use self-hosted runners for security reasons. If you notice jobs are being queued but no runners are picking them up, you likely need to enable self-hosted runner access.
Prerequisites
- You must be an organization owner or have the “Manage organization Actions policies” permission
- For personal accounts, you need admin access to your repositories
Enabling Self-Hosted Runners for Organizations
Step 1: Access Organization Settings
- In the upper-right corner of GitHub, click your profile picture
- Click Your organizations
- Next to your organization name, click Settings
Step 2: Navigate to Actions Settings
- In the left sidebar, click Actions
- Click General
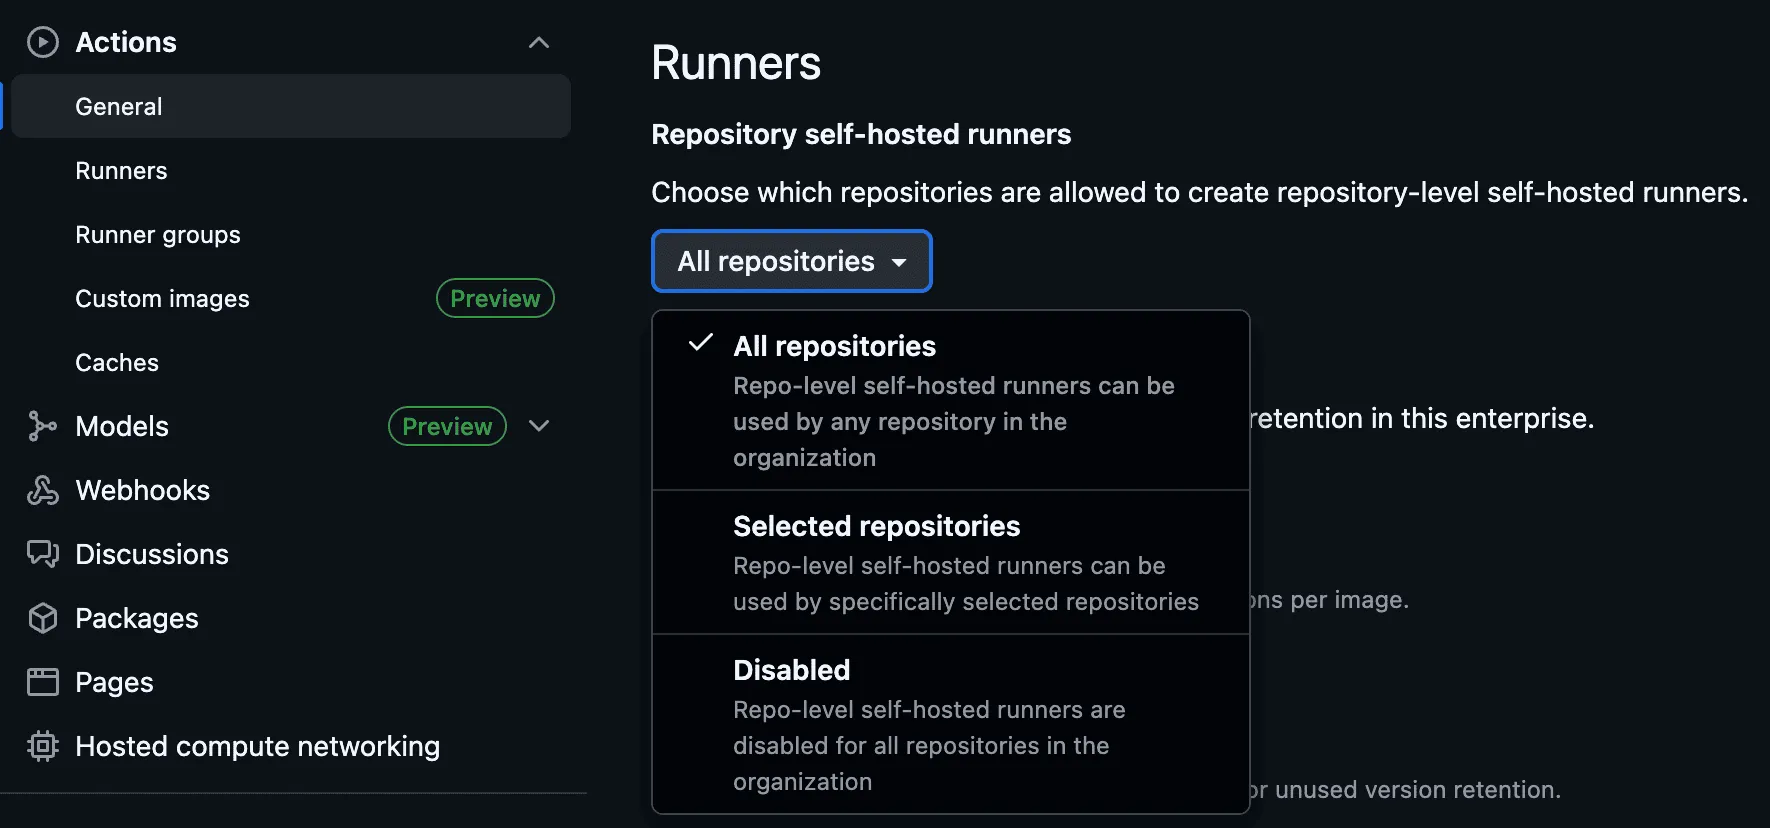
Step 3: Configure Runner Policies
Scroll down to the “Runners” section. You’ll see a dropdown menu with three options:
| Option | Description |
|---|---|
| All repositories | Self-hosted runners can be used by any repository in your organization. This is the recommended setting for Machine. |
| Selected repositories | Self-hosted runners can only be used by repositories you specifically select. |
| Disabled | Self-hosted runners cannot be created at the repository level. |
Recommended: Select “All repositories” to allow Machine runners to work with any repository in your organization.
If you choose “Selected repositories”:
- Click the selection button that appears
- Check the boxes for repositories that should have access to Machine runners
- Click Select repositories
Step 4: Save Changes
Your changes are saved automatically when you make a selection.
Enabling Self-Hosted Runners for Public Repositories
If you want to use Machine runners with public repositories, you need to configure additional settings in Runner Groups.
Step 1: Access Runner Groups
- Go to your organization’s Settings
- In the left sidebar, click Actions
- Click Runner groups
Or navigate directly to: https://github.com/organizations/YOUR-ORG-NAME/settings/actions/runner-groups
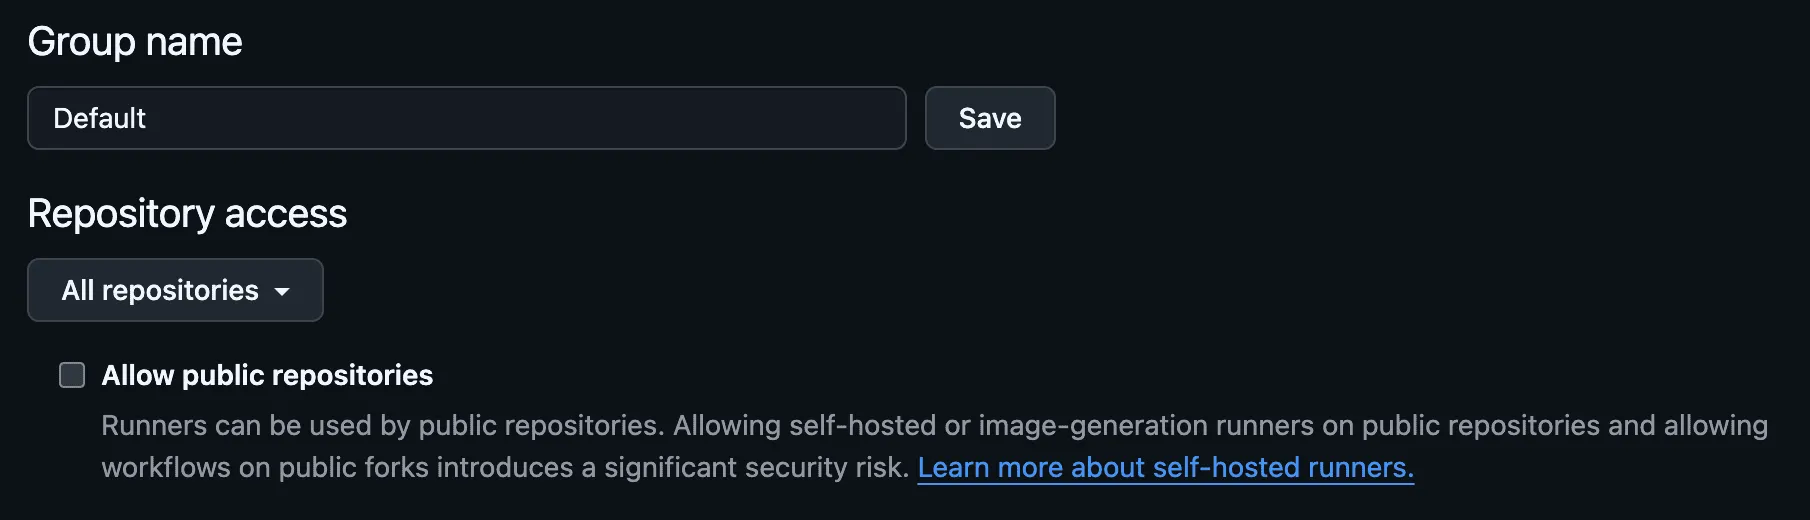
Step 2: Configure the Default Runner Group
- Click on the Default runner group (or the group you want to configure)
- Look for the “Allow public repositories” option
- Enable this setting if you want public repositories to use self-hosted runners
Enabling Self-Hosted Runners for Personal Accounts
For personal accounts (not organizations), self-hosted runners are typically enabled by default at the repository level.
Step 1: Access Repository Settings
- Navigate to your repository on GitHub
- Click Settings
- In the left sidebar, click Actions
- Click General
Step 2: Verify Runner Settings
Under the “Runners” section, ensure that self-hosted runners are not disabled.
Enterprise Considerations
If your organization is part of a GitHub Enterprise, there may be enterprise-level policies that override organization settings.
- Enterprise administrators can enforce policies that restrict self-hosted runner usage
- If you cannot modify runner settings at the organization level, contact your enterprise administrator
- Enterprise-level runner groups can be shared across multiple organizations
Troubleshooting
”No runner matching the specified labels was found”
This error typically means:
- Self-hosted runners are disabled for your repository
- The repository doesn’t have access to the runner group
- For public repos: “Allow public repositories” is not enabled in runner groups
Solution: Follow the steps above to enable self-hosted runner access.
Settings Are Grayed Out
If the runner settings are grayed out or you cannot modify them:
- Check if enterprise-level policies are overriding your settings
- Verify you have the required permissions (organization owner or “Manage organization Actions policies”)
- Contact your GitHub Enterprise administrator if applicable
Runner Shows as “Disabled”
If you previously had runners that now show as “Disabled”:
- This happens when you change the runner policy to “Disabled” or remove repository access
- Re-enable the policy or add the repository back to the allowed list
Next Steps
Once you’ve enabled self-hosted runners on GitHub:
- Set up your first workflow with Machine runners
- Explore available CPU runners and GPU runners
- Review our GitHub Actions syntax reference